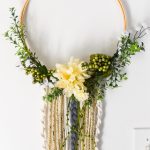
How to Make a Floral Hoop Wreath With Yarn Tutorial
Ingredients
Scale
- Caydo 12 Inch Embroidery Hoop Bamboo Circle
- Solid Yarn, 3.5 oz, Gauge 4 Medium Worsted, 100% Acrylic, Grey Mist Heather
- 3mm 328ft Macrame Cotton Cord,Not Dyed,Natural Color Handmade Soft 4-Strand Cotton Cord Rope
- Lion 640–123E Wool-Ease Thick & Quick Yarn , 97 Meters, Oatmeal
- Glue Gun
- Floral Wire
- White Fake Flowers (go to Dollar Tree first for cheapeast!)
- Fake Greenery (go to Dollar Tree First for cheapest!)
Instructions
- Start by cutting a strand of macramé corn 65″ long. 13″ of it will be the base cord where you wrap the rest around with knots.
- You will want to feed your macrame cord folded in half up behind the loop, pull over, and pull the rest of the strand through. One side will be 13″ long and the other side will be 52″ long.
- Now that you have that in place, it’s time to make a number 4 by placing the long cord over the short in the shape of a 4.
- Then pull the cord through and pull tight to make your first knot.
- You will continue to do this until you have make enough knots to create a spiral effect of knots and it is long enough for your yarn hanging from the boho style hoop wreath.
- Here is knot #4……etc. Once you have created more than 5 knots, you will naturally see how it winds itself around and creates a spiral of knots as you can see below.
- Here it is when it is done! Now you can see why you needed one strand of the macrame cord to be 4 times the length of the “base cord.” Trim off any uneven edges once you’ve finished making knots all the way down the 13″ cord. You will end up making two of these – one on each end. Now it’s time to add the rest of your yarn. Here is the pattern I used. Each of which I cut to be about 30″ long that I later trimmed a bit.
-
Now it’s time to add the rest of your yarn. Here is the pattern I used. Each of which I cut to be about 30″ long that I later trimmed a bit.
- Macrame spiral knot
- wool yarn
- macrame cord not knotted
- wool yarn
- macrame cord not knotted
- gray yarn – 6 strands in a row (which will turn into a center braid)
- macrame cord not knotted
- wool yarn
- macrame cord not knotted
- wool yarn
- macrame knots on the other end
- Now that you have the 6 strands of gray yarn in the center, split them up into 3 groups of 4 single strands of yard. Then take those three groups and braid them together.
- This is how the braid should look. Knot it at the end. You can shorten it and trim it later if need be.
- When attaching fake greenery or flowers to your wreath, it is important to have two tools – florist wire and a hot glue gun. Wire on some fake greenery and finish it off by securing the greenery/flowers where you want them using a hot glue gun.
- There is no right or wrong way to do this – basically play around and add greenery or flowers where you’d like them to be on your wreath. Secure each with floral wire.
- Be sure to find greenery that will cover the embroidery hoop screw.
- You will have to wire over the yarn and that is ok!
- After I was happy with how the greenery and flowers looked, I made sure as much was secured down with wire, and then used hot glue to hold down any loose ends.
- I personally like using picture hangers like these! They hold the hoop perfectly and are sturdy and have worked well in my house for any hoop frame I have hung up.
- My yarn was significantly longer than I wanted it to be – espeically where I was hanging this on the wall. So when you have a place for it, go ahead and trim some of the yard, and shorten the braid if need be. This is all custom based on what you prefer and where you want to hang it!
- I sort of tried making this into a V shape where the macrame on the ends were a bit shorter than the braid in the center, with the rest of the yarn tapering down toward the center.