How To Make Glitter Ornaments With Glue
Learn how to make glitter ornaments with glue! This is a fun way to combine glitter glue and a shiny bow to fill the inside of an empty plastic bulb. You’ll create the shiniest DIY ornament on the tree! These are easy enough to make that they make great DIY ornaments for kids too!
Ingredients
- Glitter glue (or get at a dollar store for cheaper!)
- Empty plastic ornament balls
- A shiny Christmas bow you can cut up
- White and gold string to hang the ornament
- Small bells or jingle bells or stars to add to the outside
Instructions
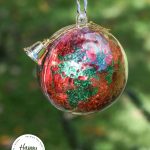
- Take your glitter glue and just randomly squirt a generous amount of glitter glue on the entire inside of the ornament on both halves of the empty clear plastic ball. I did this in three different stages. After the first application, let it dry for 24 hours. You will notice that your glue lines get significantly smaller when it dries. So then I added more and let it dry, and added a third squirt until I was happy with the glitter design. I don’t think there is any worry here about excess glue since you want as much sparkle as you can get on the inside of the ornaments.
- To enhance the shininess of the ornament, I also filled it with a cut up red shiny bow to give it a stronger, glittery effect. So go ahead, get a shiny Christmas bow, and cut it into approximately one inch pieces that you will place in the two halves.
- When you are placing the cut up bow, place the pieces shine side out on both sides so you can see the red bow shine behind the glitter glue. Fill both sides pretty full so that they won’t move around once the ornament is put together.
- Carefully and quickly put the to halves together. They do fit pretty snug.
- Then you can add Small bells or jingle bells or stars to add to the outside. Thread them through the gold and white string and tie the string for hanging purposes.
- Now it is ready to add to your festive tree! Or make a bunch of these and tie them to the outside of gift bags, as a cute addition to a present!