Wood Slice Craft Ideas: Wood Slice Placemat
DIY Placemat using wood slices – rustic or adirondack natural decor.
Ingredients
- Wood Slices for DIY Crafts Wedding Decor (you may need 2 packages of this size to get enough smaller slabs to fill your mat)
- 2.5″-2.8″ Unfinished Natural Wood Slices
- 8X12 piece of felt
- Hot glue gun
- Chop or Miter saw
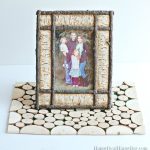
- Cabin Style Photo frame (I found mine on clearance at Walmart)
Instructions
- Start by taking your larger 2.5-2.8″ wood slice sizes and cutting them in half. I used a chop saw for this. (well actually, I don’t trust myself and my husband sawed these for me.)
- You will use these bigger pieces as your border. You need to cut a few of the halves also in half to create quarter size pieces. Those will be used for the 4 corner pieces.
- Next, lay out all of your border pieces first before you glue. You will have to move pieces around a bit like a puzzle to make sure the wood slice halves all fit just right and you may go over the edge a bit off of the felt. The wood pieces can hang over the felt a bit, just as long as there is a bit of felt to glue the slab on. You won’t need much hot glue on each piece to stick – just a dab or two on each piece is enough.
- I used the color green for my felt, but honestly, I wish I had gray or brown so that it would blend better with the wood. If you have a color in your room you want to bring out a bit, then go ahead and use that!
- The next step requires more piecing together of a puzzle so to speak, gluing on smaller wood slice pieces into the center until it fits. Again, I recommend placing and arranging a few down at a time before gluing them to be sure it fits correctly.
- Display it with a mason jar and flowers, or with a picture like I did!
Find it online: https://happydealhappyday.com/easy-diy-wood-slab-placemat/