How To Make A Diaper Tricycle (Trike) – Easy Tutorial
Diaper Tricycle DIY Tutorial for a Baby Shower Gift – The Best Step By Step Guide To Make Your Own!
Ingredients
Materials needed for the diaper tricycle:
- 2 receiving blankets or Swaddlers (I used Ziggy Baby Swaddle Blankets because my babies always liked those better than blankets alone. This brand also had a wide selection of gender-neutral patterns which I was looking for.)
- 1 bib – I used a crumb catching bib from Chewbeads. This is for my future niece/nephew and my brother-in-law is a vegetarian. 🙂
- rubberbands
- 1 baby bottle (I like Dr. Browns) or sippy cups
- 1 pair of baby socks (I got mine at Walmart)
Materials used to accessories the diaper tricycle:
- 2 receiving blankets or Swaddlers (I used Ziggy Baby Swaddle Blankets because my babies always liked those better than blankets alone. This brand also had a wide selection of gender-neutral patterns which I was looking for.)
- 1 bib – I used a crumb catching bib from Chewbeads. This is for my future niece/nephew and my brother-in-law is a vegetarian. 🙂
- rubberbands
- 1 baby bottle (I like Dr. Browns) or sippy cups
- 1 pair of baby socks (I got mine at Walmart)
Instructions
Instructions for the construction of the diaper tricycle:
- The first step is that you need to start by making diaper wheels. You will make three of them, hence why this is called a tricycle. 😉
2. Grab a few diapers and line them up so that they are about an inch apart from each other. See how I lined them up in the picture above with the arrows showing the distance between each diaper.
3. Place them in a 9″ frying pan (or 9″ cake pan) and continue adding diapers in this fashion, one at a time.
4. Your frying pan filled with diapers will get so full that you’ll think you can’t fit anymore. But keep going! You need to keep filling until you have about 25 diapers making a complete circle. Just keep tucking in the thin part of the diaper into the center.
5. You will want your large rubber bands close by because these will keep your diapers in a circle. Once your circle is complete, grab a large rubber band or 2, and wrap it around the center of the stacked diapers to hold “the wheel” together.
6. Then you will want to find the very center of the diapers and stretch it a bit so you can fit a toilet paper roll in it.
7. Now it’s time to cover up the rubber bands with some cute wide ribbon.
Wrap your wide ribbon all the way around the wheel and cut the length you need. Then grab your glue gun and add a bit to the end of one end and attach the other end to the hot glue.
You could also a small dot around the ribbon in more places to keep it in place. I chose not to though as I didn’t want to ruin any diapers with hot glue (I want the baby to actually be able to wear them!)
8. That completes the first front wheel. Now you need to go back and do these steps two more times to make the back wheels.
Now that you have all three wheels completed, it’s time to put the whole diaper tricycle together and add some accessories.
Many of the practical gifts I added to my diaper tricycle came from my list of Baby Products New Moms will Actually Use.
Instructions on adding accessories:
- To keep the wheels together, you will use a rolled up blanket or rolled up swaddle blanket to secure it all together.
- Thread the rolled blanket into each of the toilet paper rolls and secure the end with a rubber band. (Maybe one of these will turn into the baby’s first receiving blanket!)
- Tuck the rubber band back into the center of the toilet paper roll so it is hidden. Now all three wheels are connected to each other.
- Now it’s time to construct the front of the bike and make some bike handles. Again, you will need a second blanket, or in my case a ziggy baby swaddle blanket and roll it up.
- Thread the second blanket through the toilet paper roll of the front wheel.
- At this point, get a bib and attach that to the ribbons covering the back to wheels.
- Now grab a baby bottle and place that on top of the front wheel. You can also choose to use a sippy cup if you prefer.
- Use the second rolled blanket to hold the baby bottle or sippy cup in place.
- Secure the blanket over the bottle with another rubber band.
- Use the rest of the wide ribbon you have from your 9ft. roll and make a cute bow to cover the rubber band. You should cut the ends of the ribbon to make a “V” to help stop the ends from fraying.
- Now grab a pair of baby socks and place them over the ends of the blanket, making the tricycle handle bars.
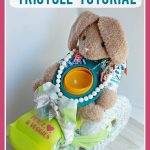
- Lastly, this tricycle bike needs a rider and I added the stuffed animal as the final touch! You can just have it sit on top of the bike and make it look like he’s holding tricycle handles the best you can. Then add any extra baby accessories you want to to make it complete.
As you can see, this stuffed rabbit also has more baby items attached it! I added as many useful baby accessories as I could to the stuffed animal “riding” the bike. Here’s what I used:
- I had a stuffed bunny, but I will recommend the Bed Buddy Warm Therapy Bear because you can warm this little guy up in the microwave for better snuggling!
- I then got a UV Skinz baby sun suit and dressed the bunny in that.
- I used a Dropper Stopper to attach a Gyro Bowl around the bunnies neck
- I topped it off with one Chewbeads necklace.
- I would have loved to also add some soft sole Robeez to the feet of this bunny!